10micro:bit Basics
The anatomy of a micro:bit, using MakeCode, and writing your first program.
The BBC micro:bit is a small computer built for learning. It has a processor, buttons, lights, sensors and a radio on one small board!
10.1The hardware#
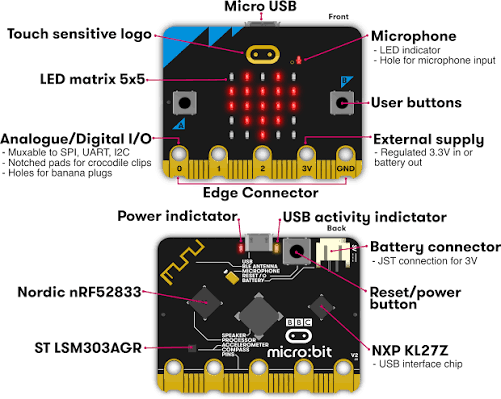
| Feature | Where it is | Input or output | Version |
|---|---|---|---|
| Buttons A and B | Front | Input | V1 and V2 |
| LED display (25 red LEDs) | Front | Output | V1 and V2 |
| Light sensor (uses the LED display) | Front | Input | V1 and V2 |
| Touch logo | Front, above the display | Input | V2 only |
| Microphone | Back, with a small hole and an LED on the front beside the logo | Input | V2 only |
| Speaker | Back | Output | V2 only |
| Accelerometer (movement, tilt and shake) | Back | Input | V1 and V2 |
| Compass (magnetometer) | Back | Input | V1 and V2 |
| Temperature sensor (inside the processor) | Back | Input | V1 and V2 |
| Radio (and Bluetooth) | Back, the antenna in the corner | Input and output | V1 and V2 |
| Pins (the gold edge connector) | Bottom edge | Input and output | V1 and V2 |
| Processor | Back | Runs your program | V1 and V2 |
| USB socket | Top edge, back | Power and downloading programs | V1 and V2 |
| Battery socket | Top edge, back | Power | V1 and V2 |
| Reset button | Back, beside the USB socket | Restarts your program | V1 and V2 |
Think for a second…
Which of these features would you use to sense each of the following?
- Someone shaking the micro:bit
- A room going dark
- Someone shouting
- A door with a magnet on it opening
- Another micro:bit sending a message
10.1.1V1 and V2#
Our class has both versions of the micro:bit. They run the same programs, but the V2 has a few extra features. You are assigned one micro:bit to use, but some activities require a v2 to complete, so please trade with another student you trust to complete them.
| Version | Numbers |
|---|---|
| v1 | 11, 12, 13, 14, 15, 16, 17, 18, 19, 20 |
| v2 | 1, 2, 3, 4, 5, 6, 7, 8, 9, 10, 21, 22, 23, 24, 25, 26, 27, 28, 29, 30 |
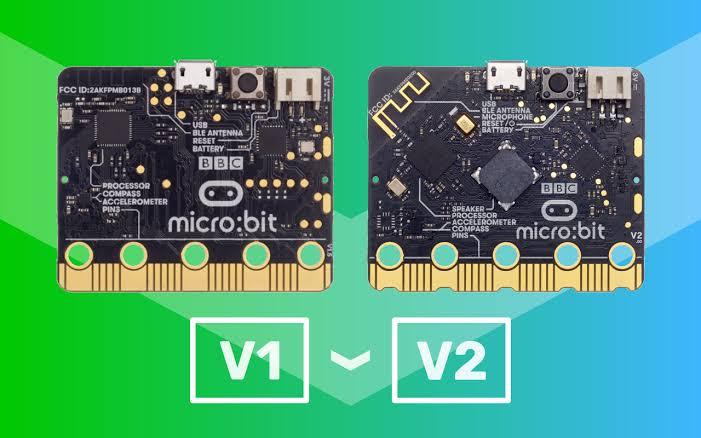
A V2 has:
- a gold touch logo above the display
- a microphone hole and a small LED beside the logo
- notches cut into the gold edge connector between the large pins
- a speaker on the back
A V1 has none of these. If your program uses the touch logo, the microphone or the speaker, it will only work on a V2.
10.2Using MakeCode#
You will set up a project in Microsoft MakeCode, write a short program, test it in the simulator, download it to a real micro:bit, and save a backup of your code.
You will need
- A micro:bit (V1 or V2)
- A micro:bit battery pack
- A USB micro cable
- A computer or chromebook, using Chrome or Edge
- Access to your Google Drive
The micro:bits are shared. Backup your work.
Students in other classes use the same micro:bits. The next person to download a program to your micro:bit erases yours, and you cannot get your code back off the board. Download a backup of your code at the end of every class.
10.3Open MakeCode#
-
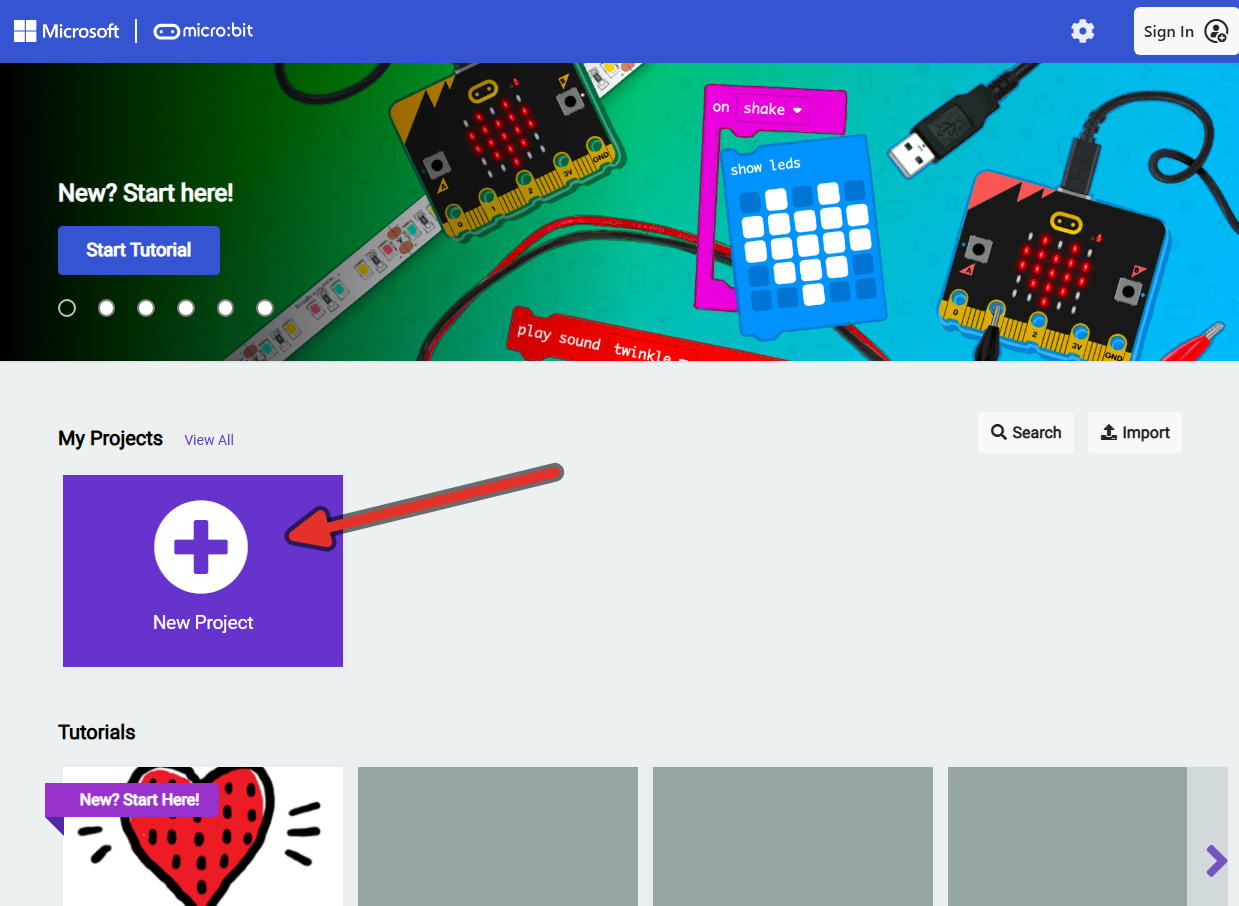
Open Chrome or Edge and go to makecode.microbit.org.
-
Click New Project. Name it
Getting Startedand click Create.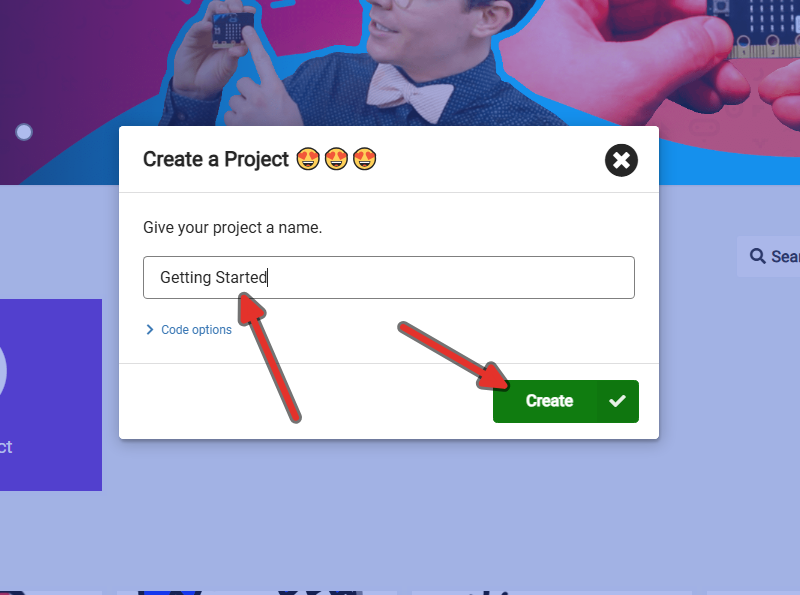
10.4MakeCode Tools#
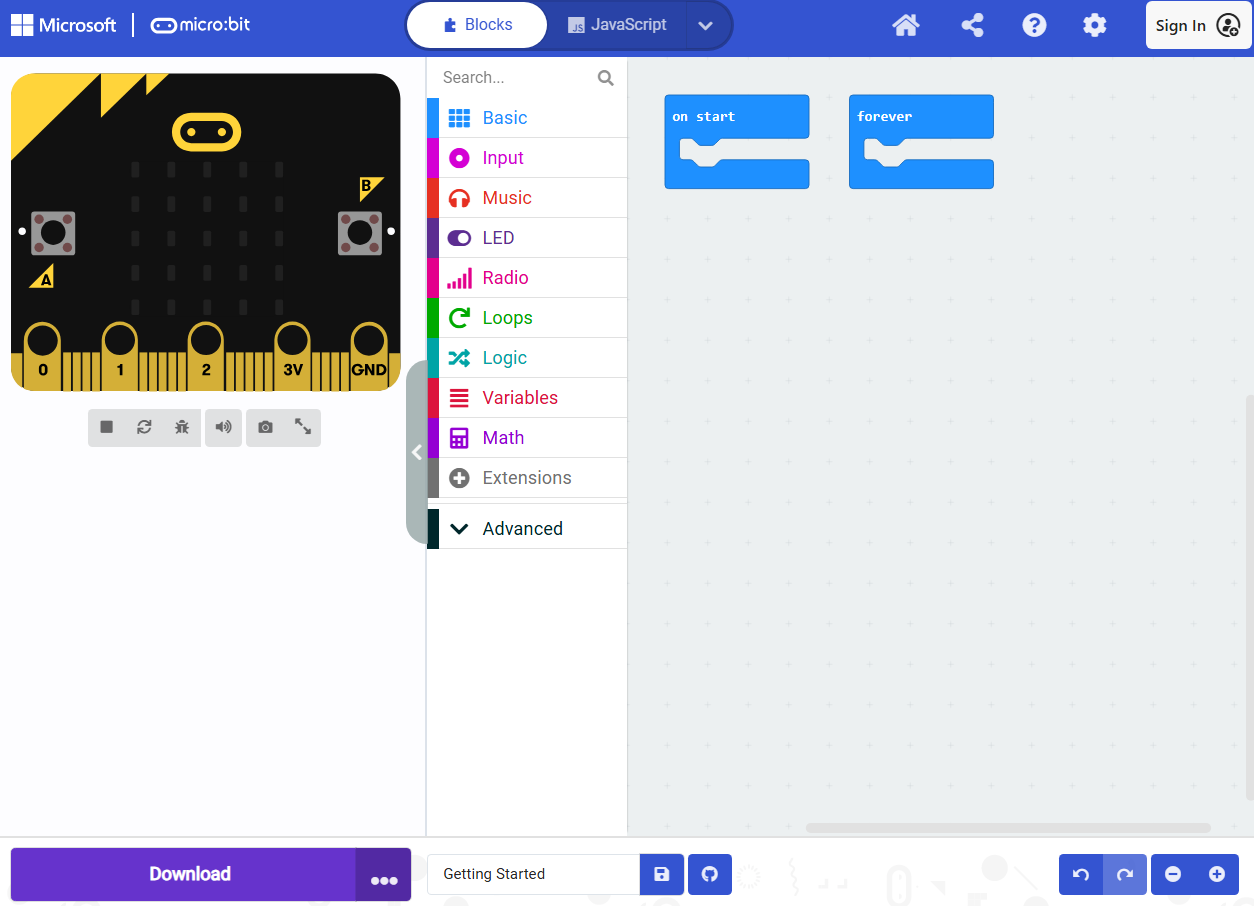
| Area | What it does |
|---|---|
| Simulator | A virtual micro:bit that runs your program as you build it. You can click its buttons |
| Toolbox | The drawers of blocks, sorted by colour. Basic, Input, Music and so on |
| Workspace | Where you drag blocks to build your program |
| Download | Sends your program to a real micro:bit |
| Project name | The name of your project, with a save button beside it |
A new project starts with two blocks already in the workspace.
on start- Runs the blocks inside it once, when the micro:bit turns on or resets.
forever- Runs the blocks inside it over and over, for as long as the micro:bit has power. This is a loop.
10.5Write your first program#
10.5.1Show some text#
-
Open the Basic drawer. Drag a
show stringblock into theon startblock until it clicks into place.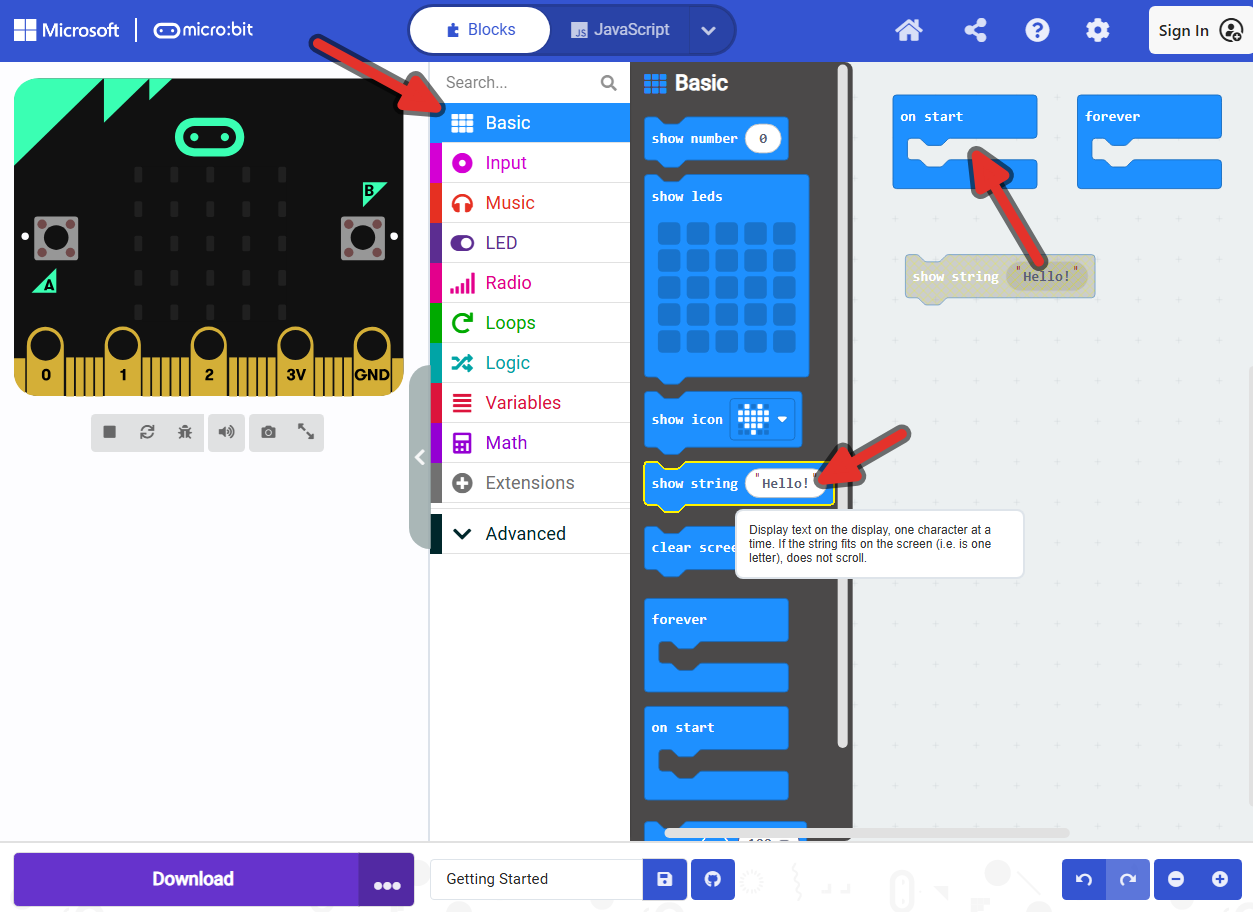
-
Click the word
Hello!inside the block and type your first name.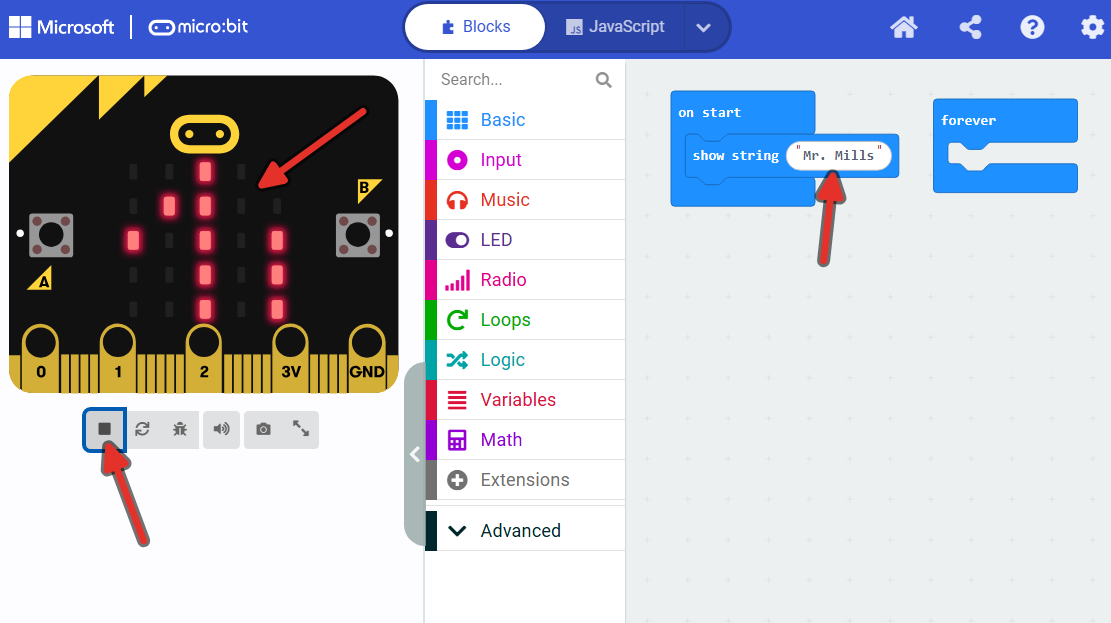
-
Watch the simulator. Your name scrolls across the display once.
Restart the simulator
The simulator restarts every time you change a block. To run it again without changing anything, click the restart button (the circular arrow) under the simulator.
10.5.2Make a heartbeat#
-
From Basic, drag a
show iconblock into theforeverblock. Leave it on the heart.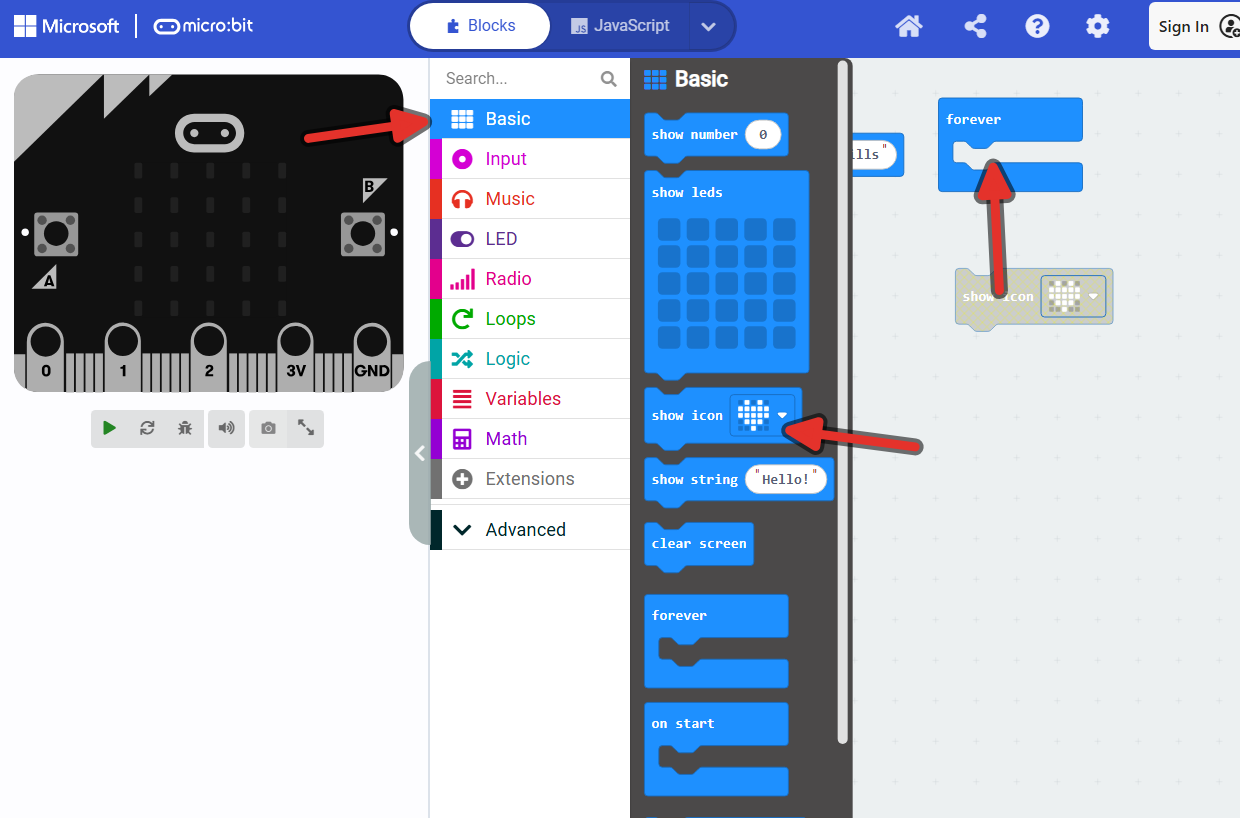
-
Drag a second
show iconblock underneath the first, insideforever. Click the heart and choose the small heart.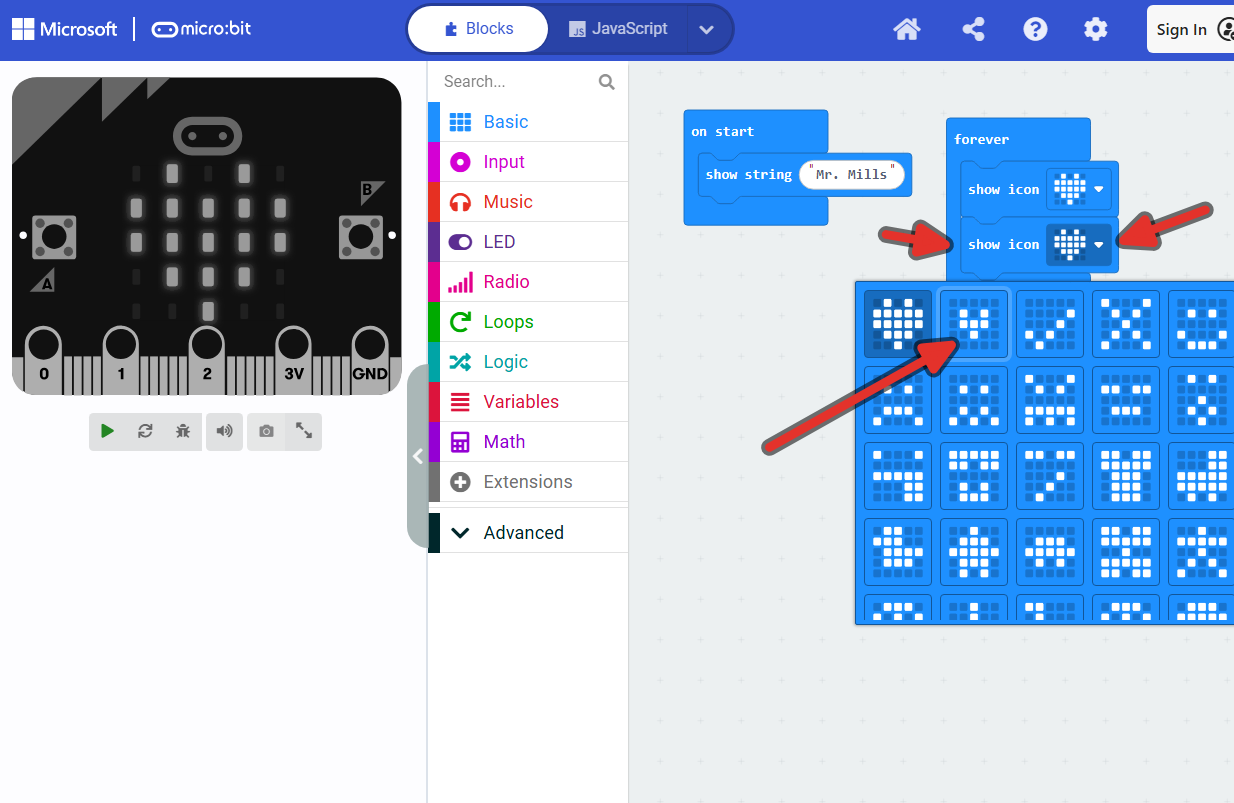
-
Watch the simulator. The heart beats. The
foreverloop shows the big heart, then the small heart, then starts again from the top. -
From Basic, drag a
pause (ms)block between the twoshow iconblocks. Set it to500.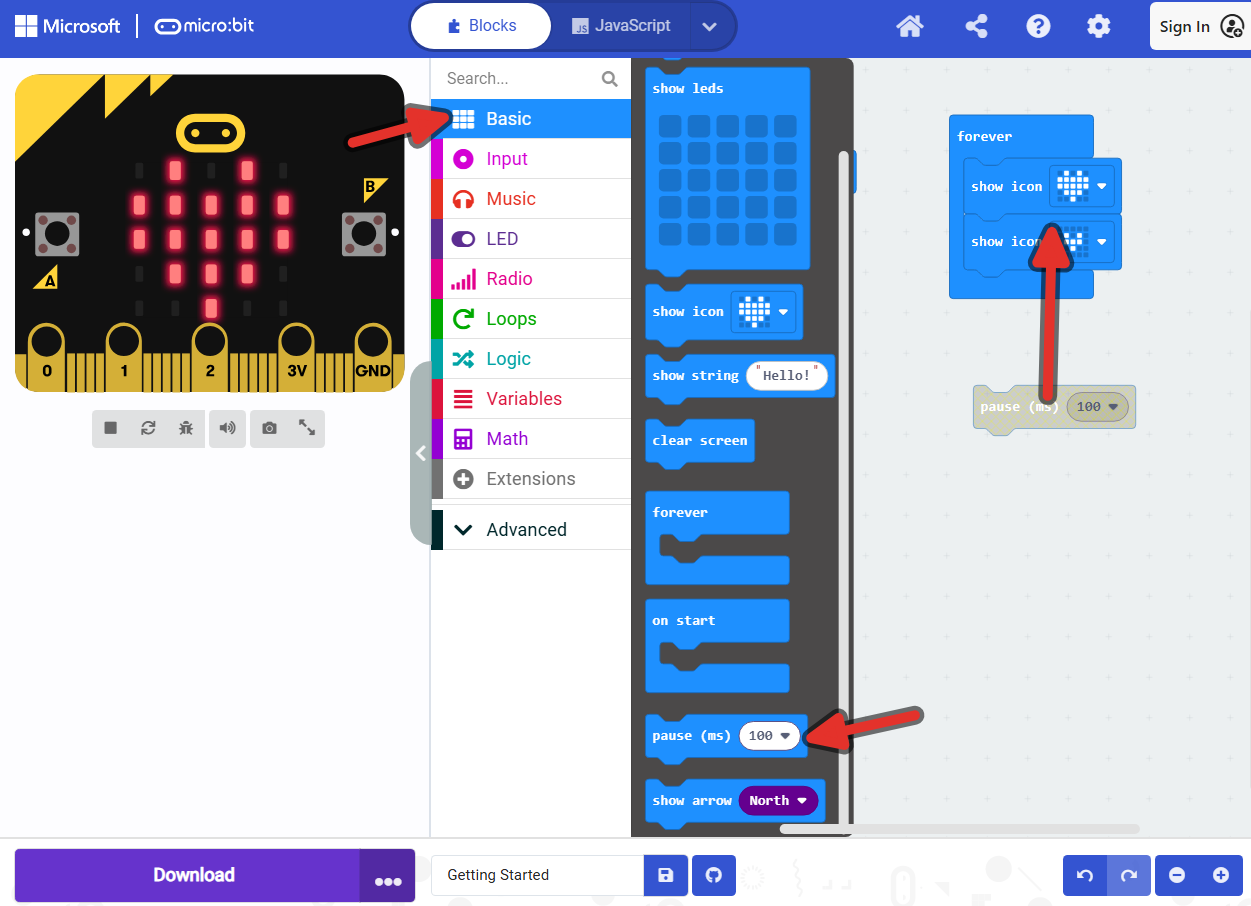
A pause is measured in milliseconds (ms). 1000 ms is one second, so 500 ms is half a second. Try other numbers and watch how the heartbeat changes.
This is a sequence. The micro:bit runs the blocks from top to bottom, one at a time. Swap the order of the blocks and the result changes.
10.5.3React to the buttons#
So far the program only does what it was told when it started. Now it will react to events.
-
Open the Input drawer. Drag an
on button A pressedblock into an empty part of the workspace. It does not go inside anything.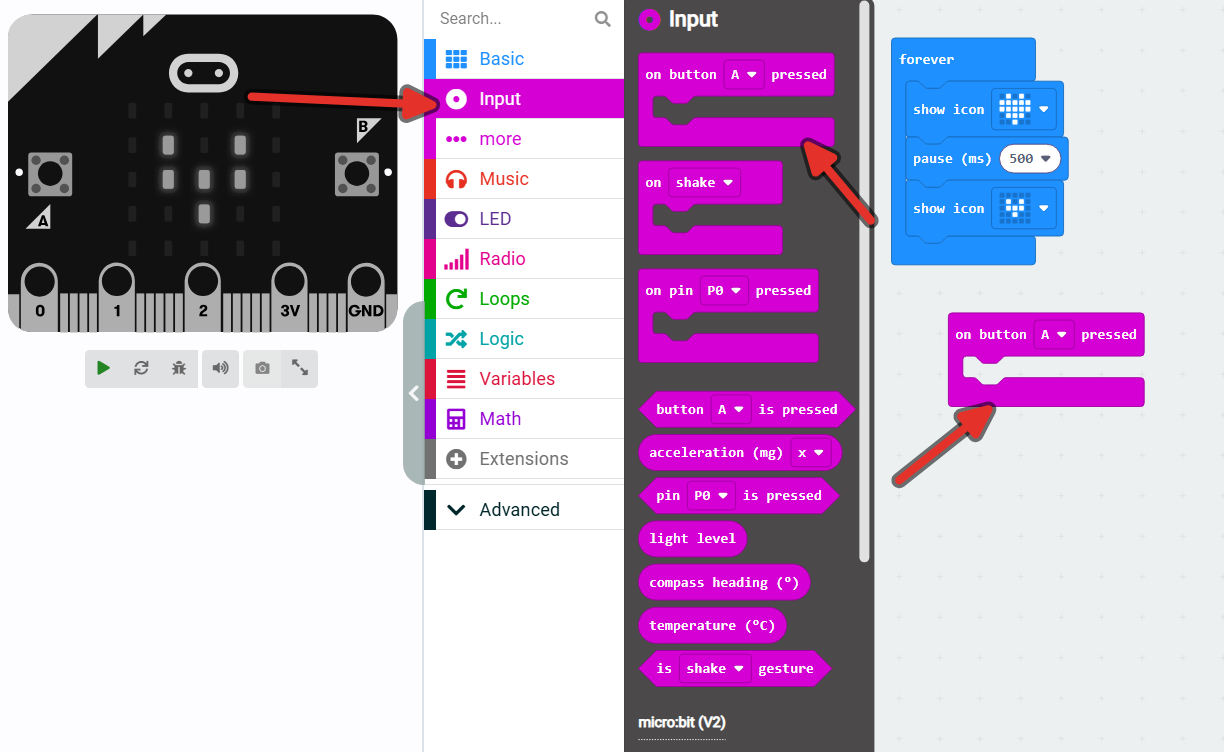
-
From Basic, drag a
show iconblock inside it and choose the happy face.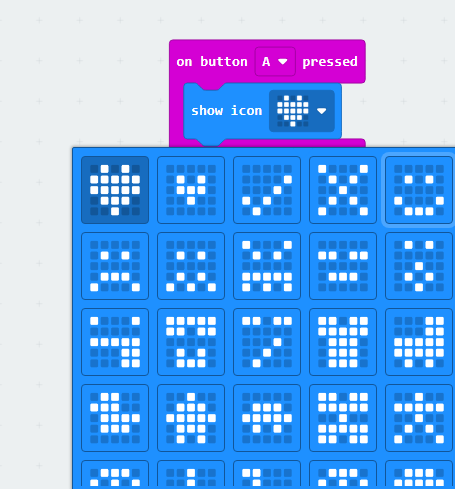
-
Drag in a second
on button A pressedblock. Click the A and change it to B. Put ashow iconblock inside it with the sad face.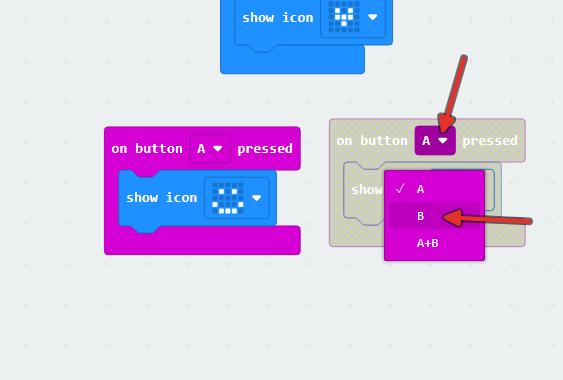
-
Test is by pressing the A or B button on the simulator. Each face shows for a moment, then the heartbeat takes over again.
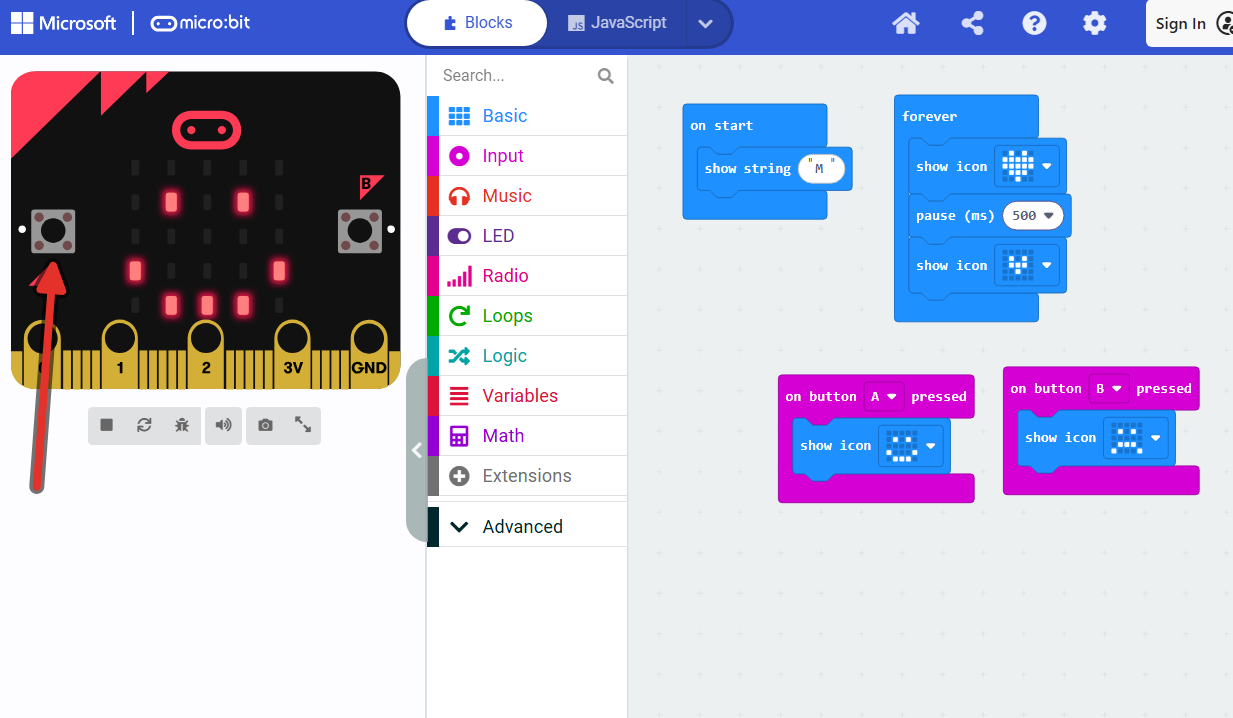
Faded blocks do not run
A block that is not inside on start, forever or an event block appears
faded, and it never runs. If a block is not doing anything, check that it
is clicked into place inside another block.
10.5.4Draw your own picture#
-
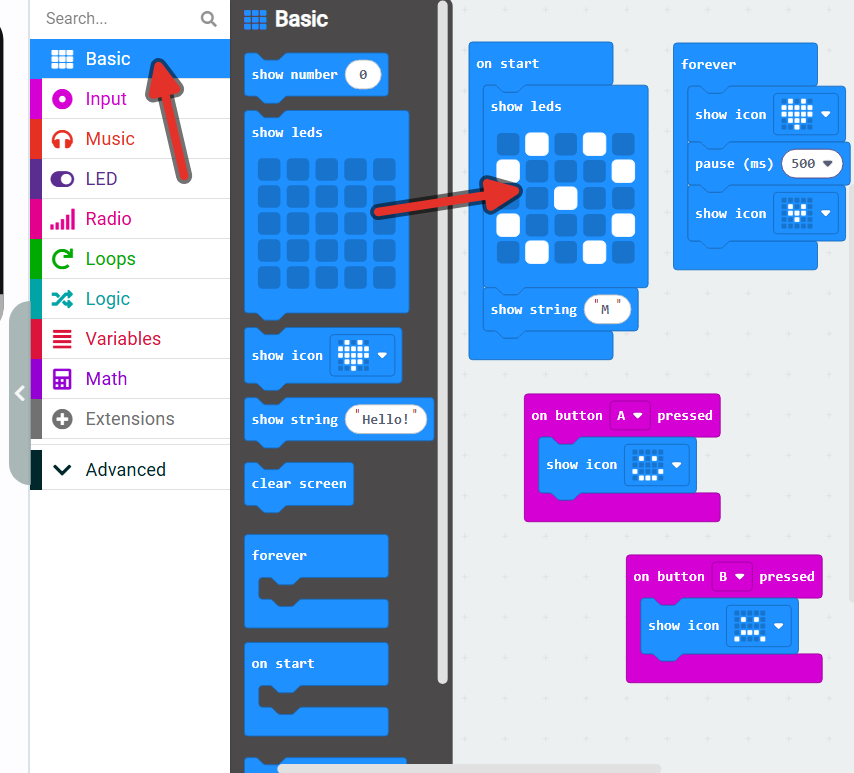
From Basic, drag a
show ledsblock intoon start, under yourshow stringblock. -
Click the squares to turn LEDs on and off and draw a picture.
10.6Download it to the micro:bit#
There are two ways to get your program onto a micro:bit. Both work on the school computers. Learn both, because if one does not work on the day, the other will.
-
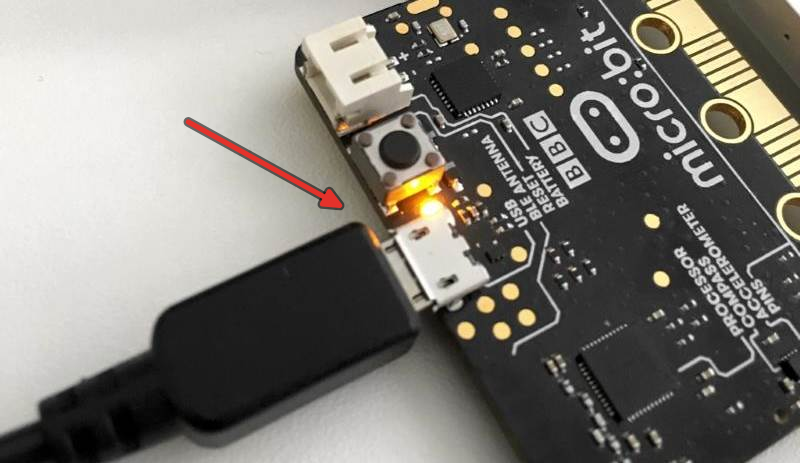
Plug the small end of the USB cable into the micro:bit and the large end into the computer. The yellow LED on the back of the micro:bit lights up.
10.6.1Method 1: Connect directly (WebUSB)#
This method pairs the browser with your micro:bit, so every download after that takes one click.
-
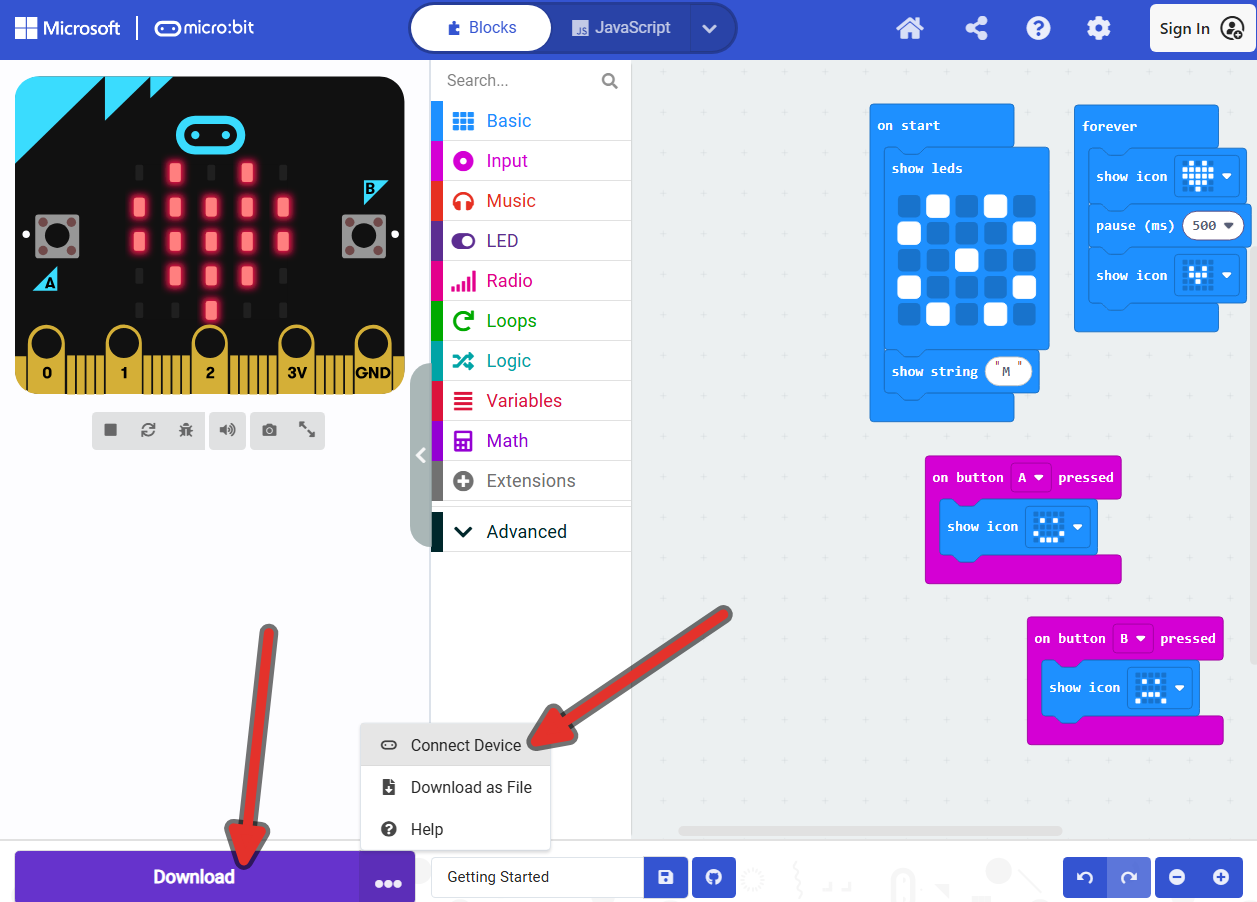
Click the three dots beside the Download button and choose Connect Device.
-
Follow the steps in the dialog. When the browser asks which device to connect, choose BBC micro:bit CMSIS-DAP and click Connect.
-
Click Download. The yellow LED on the micro:bit flashes while the program copies, then your program starts.
If you swap to a different micro:bit, repeat the Connect Device steps.
10.6.2Method 2: Drag the file (download as a .hex file)#
This method saves your program as a file, then you copy it onto the micro:bit like a USB drive.
-
Click the three dots beside the Download button and choose Download as File (or click Download when no device is connected). A file named
microbit-Getting-Started.hexsaves to your Downloads folder.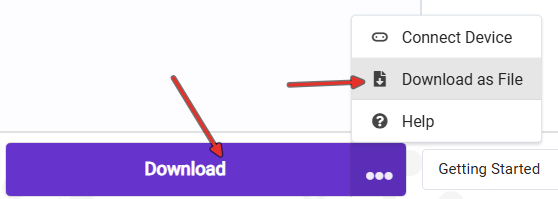
-
Open File Explorer. The micro:bit shows up as a drive called MICROBIT.
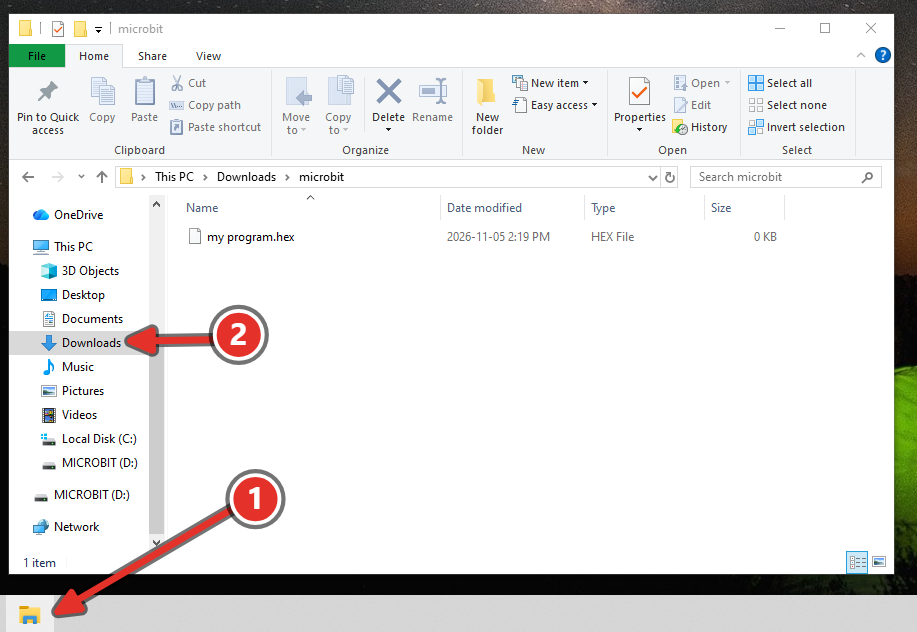
-
Drag the
.hexfile from Downloads onto the MICROBIT drive. The yellow LED flashes while the file copies.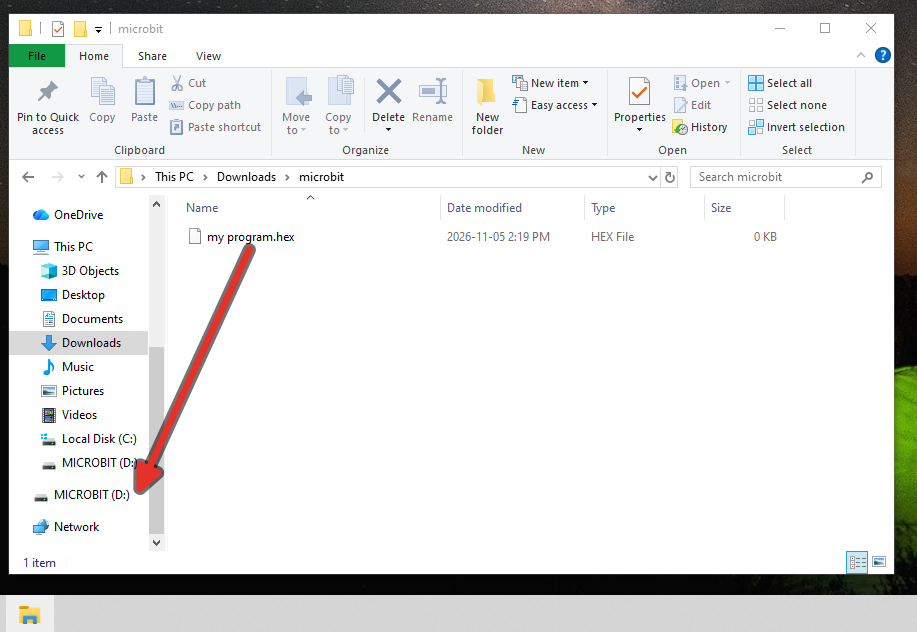
-
The MICROBIT drive closes and opens again, and your program starts. This is normal. Your
.hexfile will not appear on the drive. The micro:bit has already turned it into a program.
10.6.3Test it on the real board#
-
Watch your name scroll and your picture appear, then the heartbeat start.
-
Press A and B on the micro:bit.
-
Press the reset button on the back. Your program starts again from
on start.
A sad face and the number 927
If a V1 micro:bit shows a sad face and scrolls 927, your program uses a block that only works on a V2, such as the touch logo, the microphone or the speaker. Swap to a V2, or remove that block.
10.7Run it without a computer#
-
Unplug the USB cable.
-
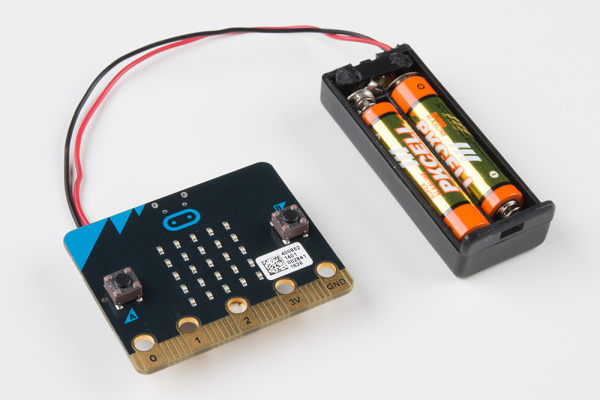
Plug a battery pack into the battery socket on the top edge of the micro:bit and switch it on. Your program runs, because it is stored on the micro:bit until someone downloads a new one.
-
Switch the battery pack off when you are finished.
10.8Save your work#
MakeCode keeps your projects in the browser on the computer you used. If you
use a different computer, or the browser is cleared, they are gone. A .hex
file is the backup: it holds your whole program, blocks and all.
10.8.1Save a backup#
Do this at the end of every class.
-
Click the save icon beside the project name at the bottom of the screen. The
.hexfile saves to your Downloads folder.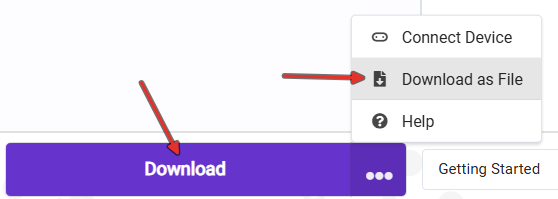
-
Open your Google Drive and make a folder called
TAS1O micro:bit. -
Upload the
.hexfile to that folder. Add the date to the end of the file name, likemicrobit-Getting-Started-Nov-10.hex, so you can tell your versions apart.
10.8.2Open a backup#
-
Download the
.hexfile from your Google Drive. -
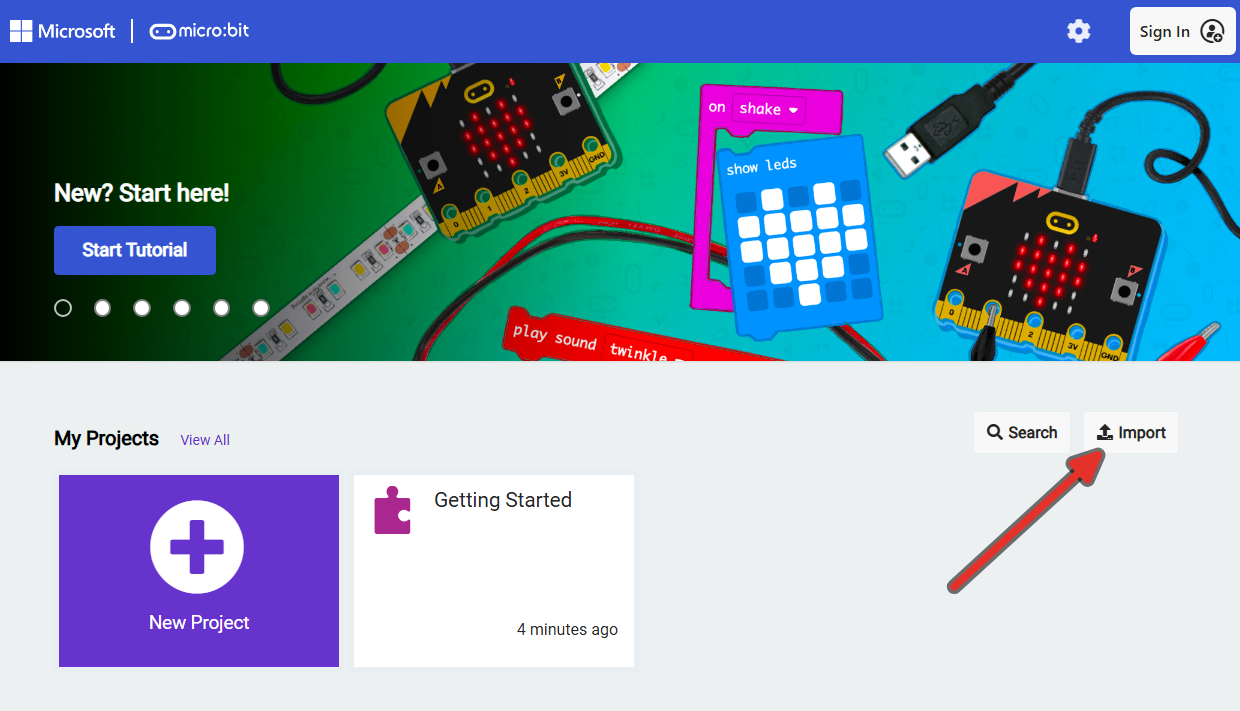
Go to the MakeCode home page and click Import, then Import File.
-
Choose your
.hexfile. Your project opens with every block where you left it.
You can also drag a .hex file straight onto the MakeCode window to open it.
10.9Sign-off#
Call your teacher over when you are ready. You should be able to explain what each block does.
- A complete program that shows text and a custom picture on start, a heartbeat forever, a happy face when button A is pressed, and a sad face when button B is pressed.
- My program is uploaded to and runs on a real micro:bit, using a battery pack
- My
.hexbackup is in Google Drive, and I have opened by backup in Make Code via Import
10.10Level Up#
- Make an animation from four or more
show ledsblocks insideforever. - From Input, use
on shaketo show a different picture. - On a V2, use
on logo pressedto play a sound from the Music drawer. - Make button A scroll your name and button B scroll your favourite food.